

The Form Editor
The SmartForms V2 editor is a single page split into three areas: the top toolbar, the left toolbox with question types, and the right property panel that changes based on what you’ve clicked on. This page is the reference for each of those areas. For the step-by-step “build my first form” walkthrough, see Creating A Smart Form.
The top toolbar
The top toolbar has every action you can take on the form as a whole. Buttons from left to right:
| Button | What it does |
|---|---|
| Forms (arrow back) | Leaves the editor and returns to the Smart Forms list. It does not save the form and does not ask first, so click Save before you leave. |
| Designer | Switches the main area to the editing view (the default). |
| Preview | Switches the main area to a preview of the form as a patient would see it. See Preview the form below. |
| Undo | Reverses your last change. Works repeatedly. |
| Redo | Re-applies a change you undid. |
| Save | Saves the form. It does not send the form to anyone. |
| Sharing | Opens the Sharing panel for this form. See Sharing Smart Forms With Other Practitioners. |
The toolbar is the same in both Designer and Preview tabs. The Designer and Preview buttons highlight to show which tab you’re in.
The left toolbox
The toolbox lists every question type you can drag into the form. Click an item to add it at the current cursor position, or drag it into the form to place it where you want.
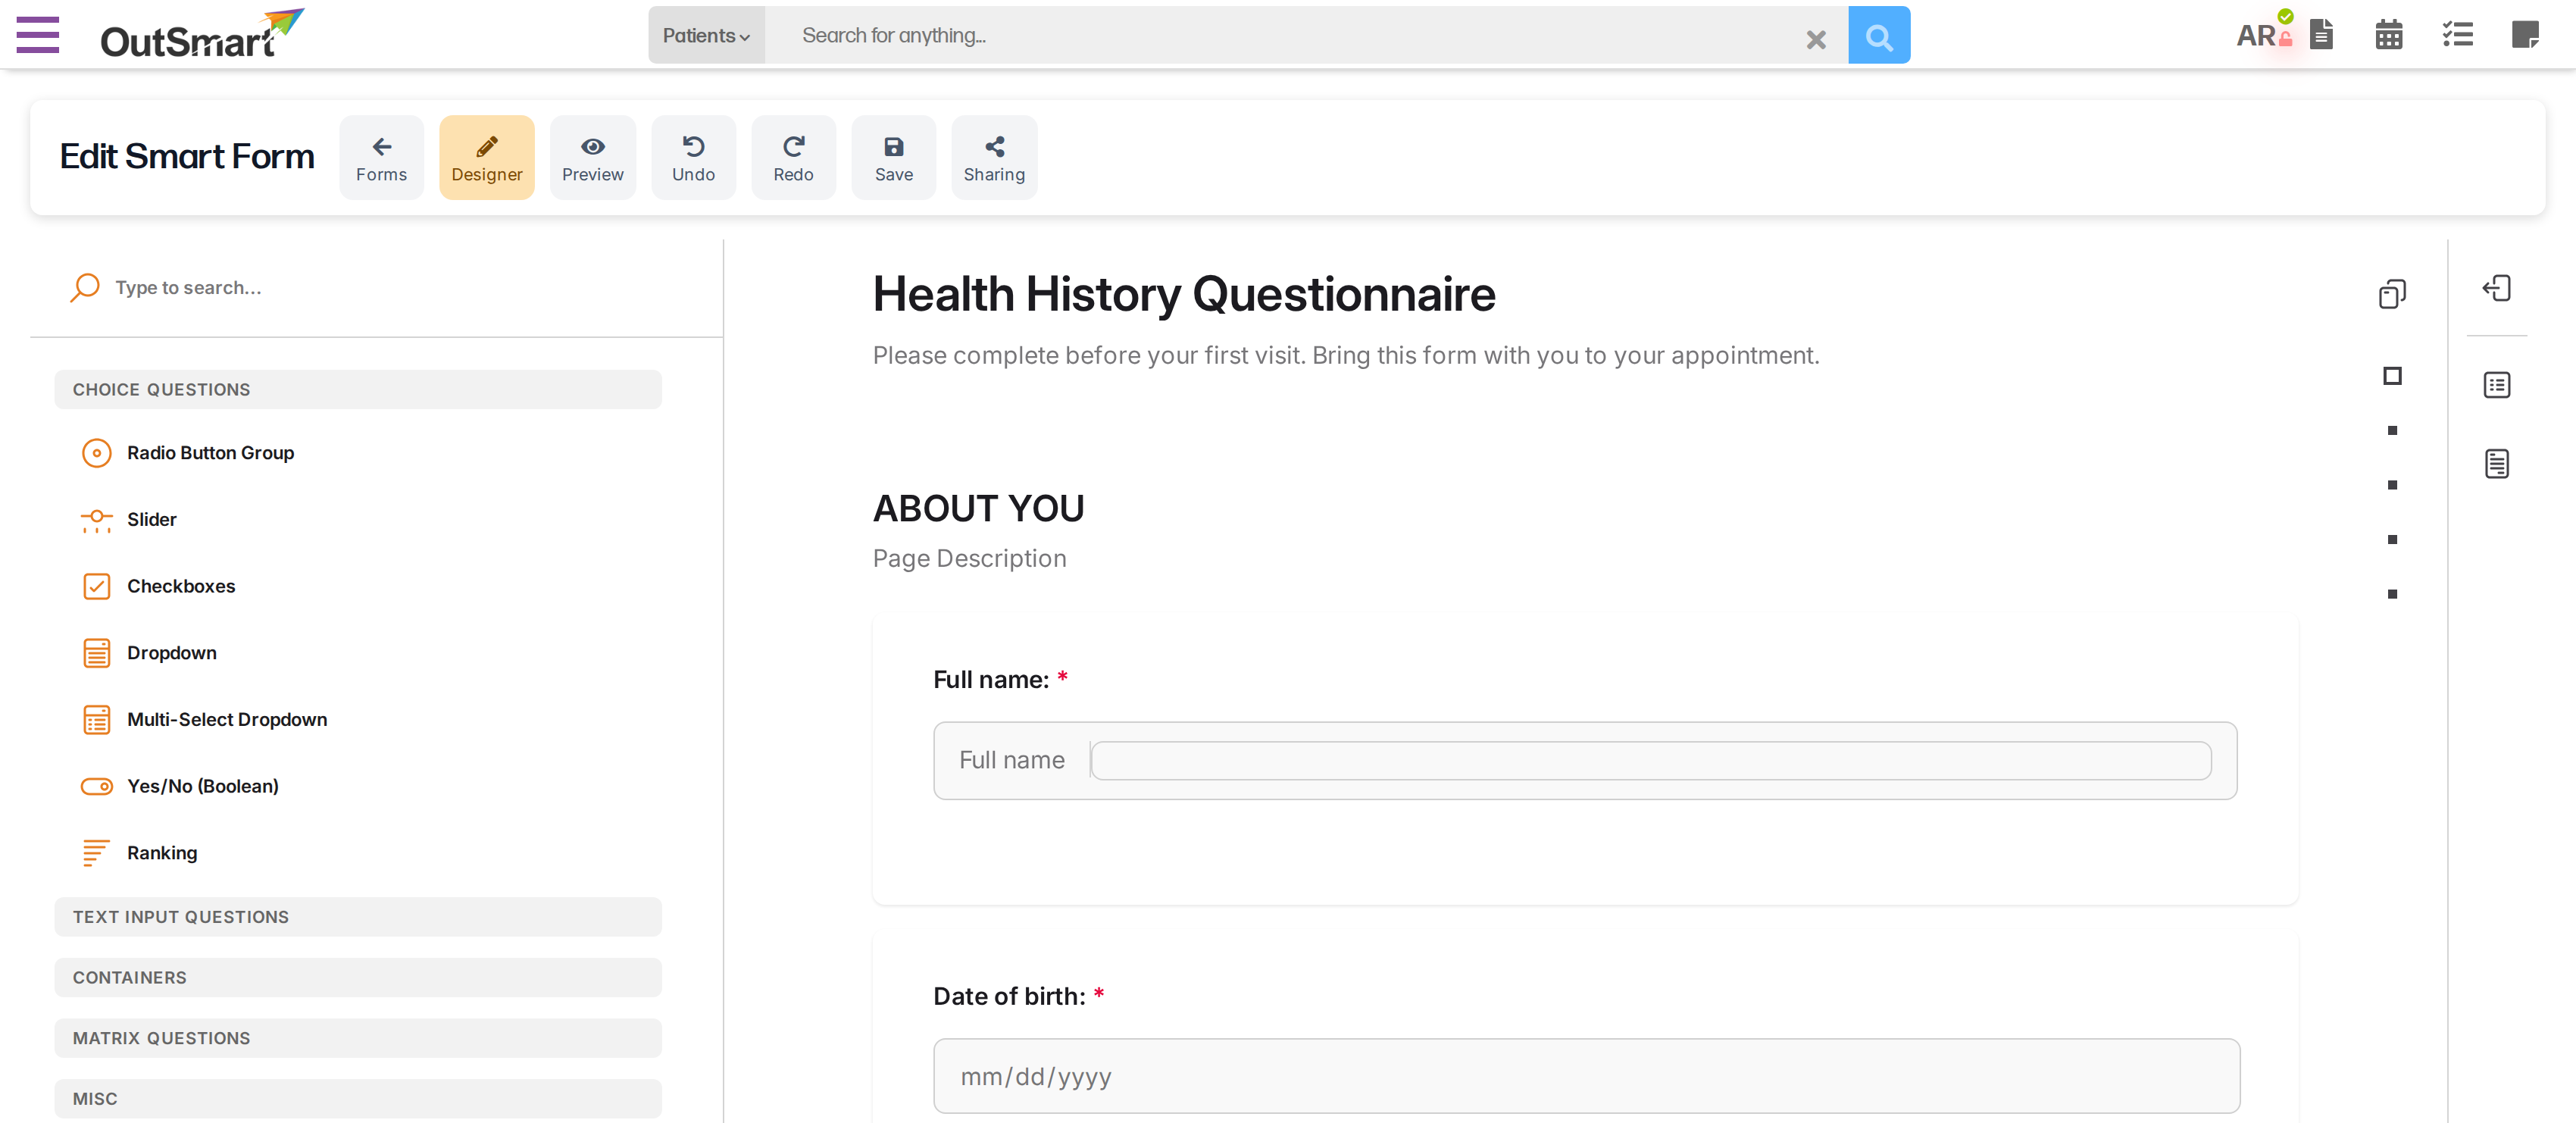
The form editor with the toolbox on the left. Click a category to open it, and click or drag an item to add it to the form.
The toolbox groups items into categories you can click to expand or collapse:
| Category | What’s in it |
|---|---|
| Choice Questions | Radio Button Group, Slider, Checkboxes, Dropdown, Multi-Select Dropdown, Yes/No (Boolean), Ranking |
| Text Input Questions | Single-Line Input, Long Text, Multiple Textboxes |
| Containers | Panel, Dynamic Panel |
| Matrix Questions | Single-Select Matrix, Multi-Select Matrix, Dynamic Matrix |
| Misc | Text block, Image, Signature |
| Templates | Pre-built question shapes you customize. See below. |
| Clinical content | Pre-built clinical question sets you drop in as a whole. See below. |
For what each individual question type does and how it looks to the patient, see the Question Types Reference.
Text block
A Text block puts text on the form that is not a question. Use it for instructions, a heading between sections, or a note explaining why you are asking something.
The patient reads a Text block and has nothing to answer. The text also appears, in a grey box, where it sits on the form when you view the patient’s answers and in the PDF copy of the submission, so you read the answers with the same instructions the patient saw. Type into it directly on the form, or in the property panel on the right, and use the small formatting toolbar for bold, italic, underline and lists.
A form that uses a question nobody is meant to answer to show instructions has a blank answer under that question in every submission. Replacing that question with a Text block keeps the instructions and removes the blank answer.
Guidance notices
Some toolbox templates include an instruction card explaining how to use them. These show as orange notices in the editor. They are guidance for you while you build, and patients never see them.
Clinical content
The Clinical content category contains pre-built question sets written and maintained by the OutSmart EMR team. Each item is a multi-question block you can drop into your form as a starting point. It includes:
- Medical History, Conditions. A checkbox list of 92 medical conditions, organized as a single flat checklist.
- Review of Systems. 15 body-system panels (cardiovascular, respiratory, etc.) with 247 conditions in total. Use for a thorough review without re-typing every condition.
- Orthotics, Conditions. A 17-condition flat checklist used by orthotics-focused intake forms.
After you drop one in, the questions are yours. Rename them, remove rows you don’t need, change choices. The OutSmart team adds new clinical content over time; new items appear in this category automatically.
Templates
The Templates category sits above Clinical content in the toolbox. It contains pre-built question shapes, which are placeholder content you customize. It includes:
- Multi-select with describe. A row-and-column layout where the patient marks Yes on each row that applies to them, and a “Please describe” text field appears next to each row they marked Yes. Useful for “What are you concerned about? Check all that apply and describe each.” Replaces what would otherwise be 20 separate questions with one tidy table.
Like Clinical content, templates are starting points. Once dropped in, you rename the rows and the question to fit.
The right property panel
When you click on the form’s background (no question selected), the property panel shows form-level settings: the form’s title and description, and the list of pages.
When you click on a specific question, the property panel switches to that question’s settings, grouped into tabs along the right edge. Tabs vary by question type, but the common ones are:
| Tab | What you set there |
|---|---|
| General | Title, description, whether the question is required, comment-box options. The most common tab for everyday edits. |
| Choice Options | For question types that have choices (radio, checkbox, dropdown, etc.). The list of choices, their wording, “Other” / “None” toggles, ordering. |
| Layout | Whether the question takes its own row, and how many columns of choices to show. |
| Pages (form-level only) | The list of pages in the form. Drag to reorder. |
Click between tabs as needed. Changes apply immediately, though you still need to click Save in the toolbar to make them permanent.
Preview the form
The Preview tab in the top toolbar shows the form exactly as a patient sees it: same layout, same styling, same Complete button. Use it to spot questions that need rewording, required fields that don’t belong, choice lists that are too long.
To preview:
- Click Preview in the top toolbar.
- Fill the form like a patient would.
- Click Designer to switch back to editing.
Preview is a practice space. Anything you type in Preview is thrown away when you switch back. Patients don’t see what you previewed; only what you wrote in the Designer tab.
If your form has no questions yet, the Preview tab shows a picture reminding you to add some.
What you don’t see in the editor
A few intentionally hidden things to know about:
- No save-as-template option. Each form is its own thing. To reuse a form, Duplicate it from the Smart Forms list.
- No publish step. A form is available to send the moment it’s saved.
- No version history. Each save overwrites the prior version. Once a form has been sent, it is locked from edits anyway. To make changes, duplicate and edit the copy (see Editing A Smart Form).
Related Pages
- Creating A Smart Form. The step-by-step walkthrough for building your first form.
- Question Types Reference. Every question type in the toolbox with what each one does.
- Editing A Smart Form. What’s editable once the form is locked, and the duplicate-and-edit pattern.
- Sharing Smart Forms With Other Practitioners. Opens from the Sharing button on the toolbar.