

The Patient Card And A Patient's Details
The patient card is the card at the top left of the Patient Workspace. It shows who the patient is and how to reach them, and it is where you edit the details on the patient’s record.
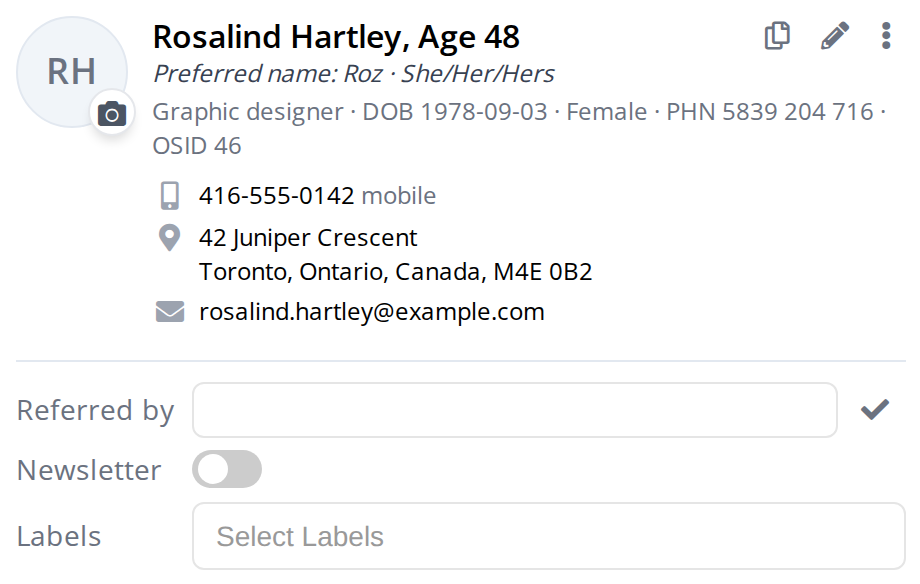
The patient card. The details are at the top, the three buttons are in the top right corner, and Referred by, Newsletter and Labels are underneath.
What The Card Shows
- The photo. The patient’s photo, or their initials when there is no photo.
- The name and age, then the preferred name and pronouns when the record has them.
- A line of identity details: occupation, date of birth, gender, health card number (PHN) and OSID, which is the patient’s OutSmart ID.
- The contact details: the mobile, home and work phone numbers, the address and the email address. Each phone number is labelled mobile, home or work.
A detail the record does not have is left off the card, so a short card means the record is missing details, not that something failed to load.
Beside the email address is a small mark that says whether the clinic’s emails are reaching that address. When Emails To A Patient Are Stopped explains it.
Changing The Photo
Click the photo, or the small camera badge on its corner, and choose a JPG or PNG picture from your computer. The picture is uploaded as soon as you choose it.
The Three Buttons In The Corner
| Button | What it does |
|---|---|
| Copy patient details, two sheets of paper | Copies the patient’s details as plain text, ready to paste into another program. See Copying A Patient’s Details |
| Edit details, a pencil | Opens the patient’s full details for editing, described below |
| More actions, three dots | Opens a menu with Print Label, Copy Settings, Client Update and Change history |
The More actions menu holds:
- Print Label opens a small window with the patient’s name and address laid out as a label, with a Print Label button. The window offers an Address Label and a Patient Label, both 1 1/8 by 3 1/2 inches.
- Copy Settings chooses what the copy button copies. See Copying A Patient’s Details.
- Client Update lets the patient check and correct their own details on a clinic tablet or from an emailed link. See Client Update: Patients Check Their Own Details.
- Change history lists every change to the patient’s details, as described at the end of this page.
Editing The Patient’s Details
Click the pencil. A panel opens across the top of the workspace with two columns.
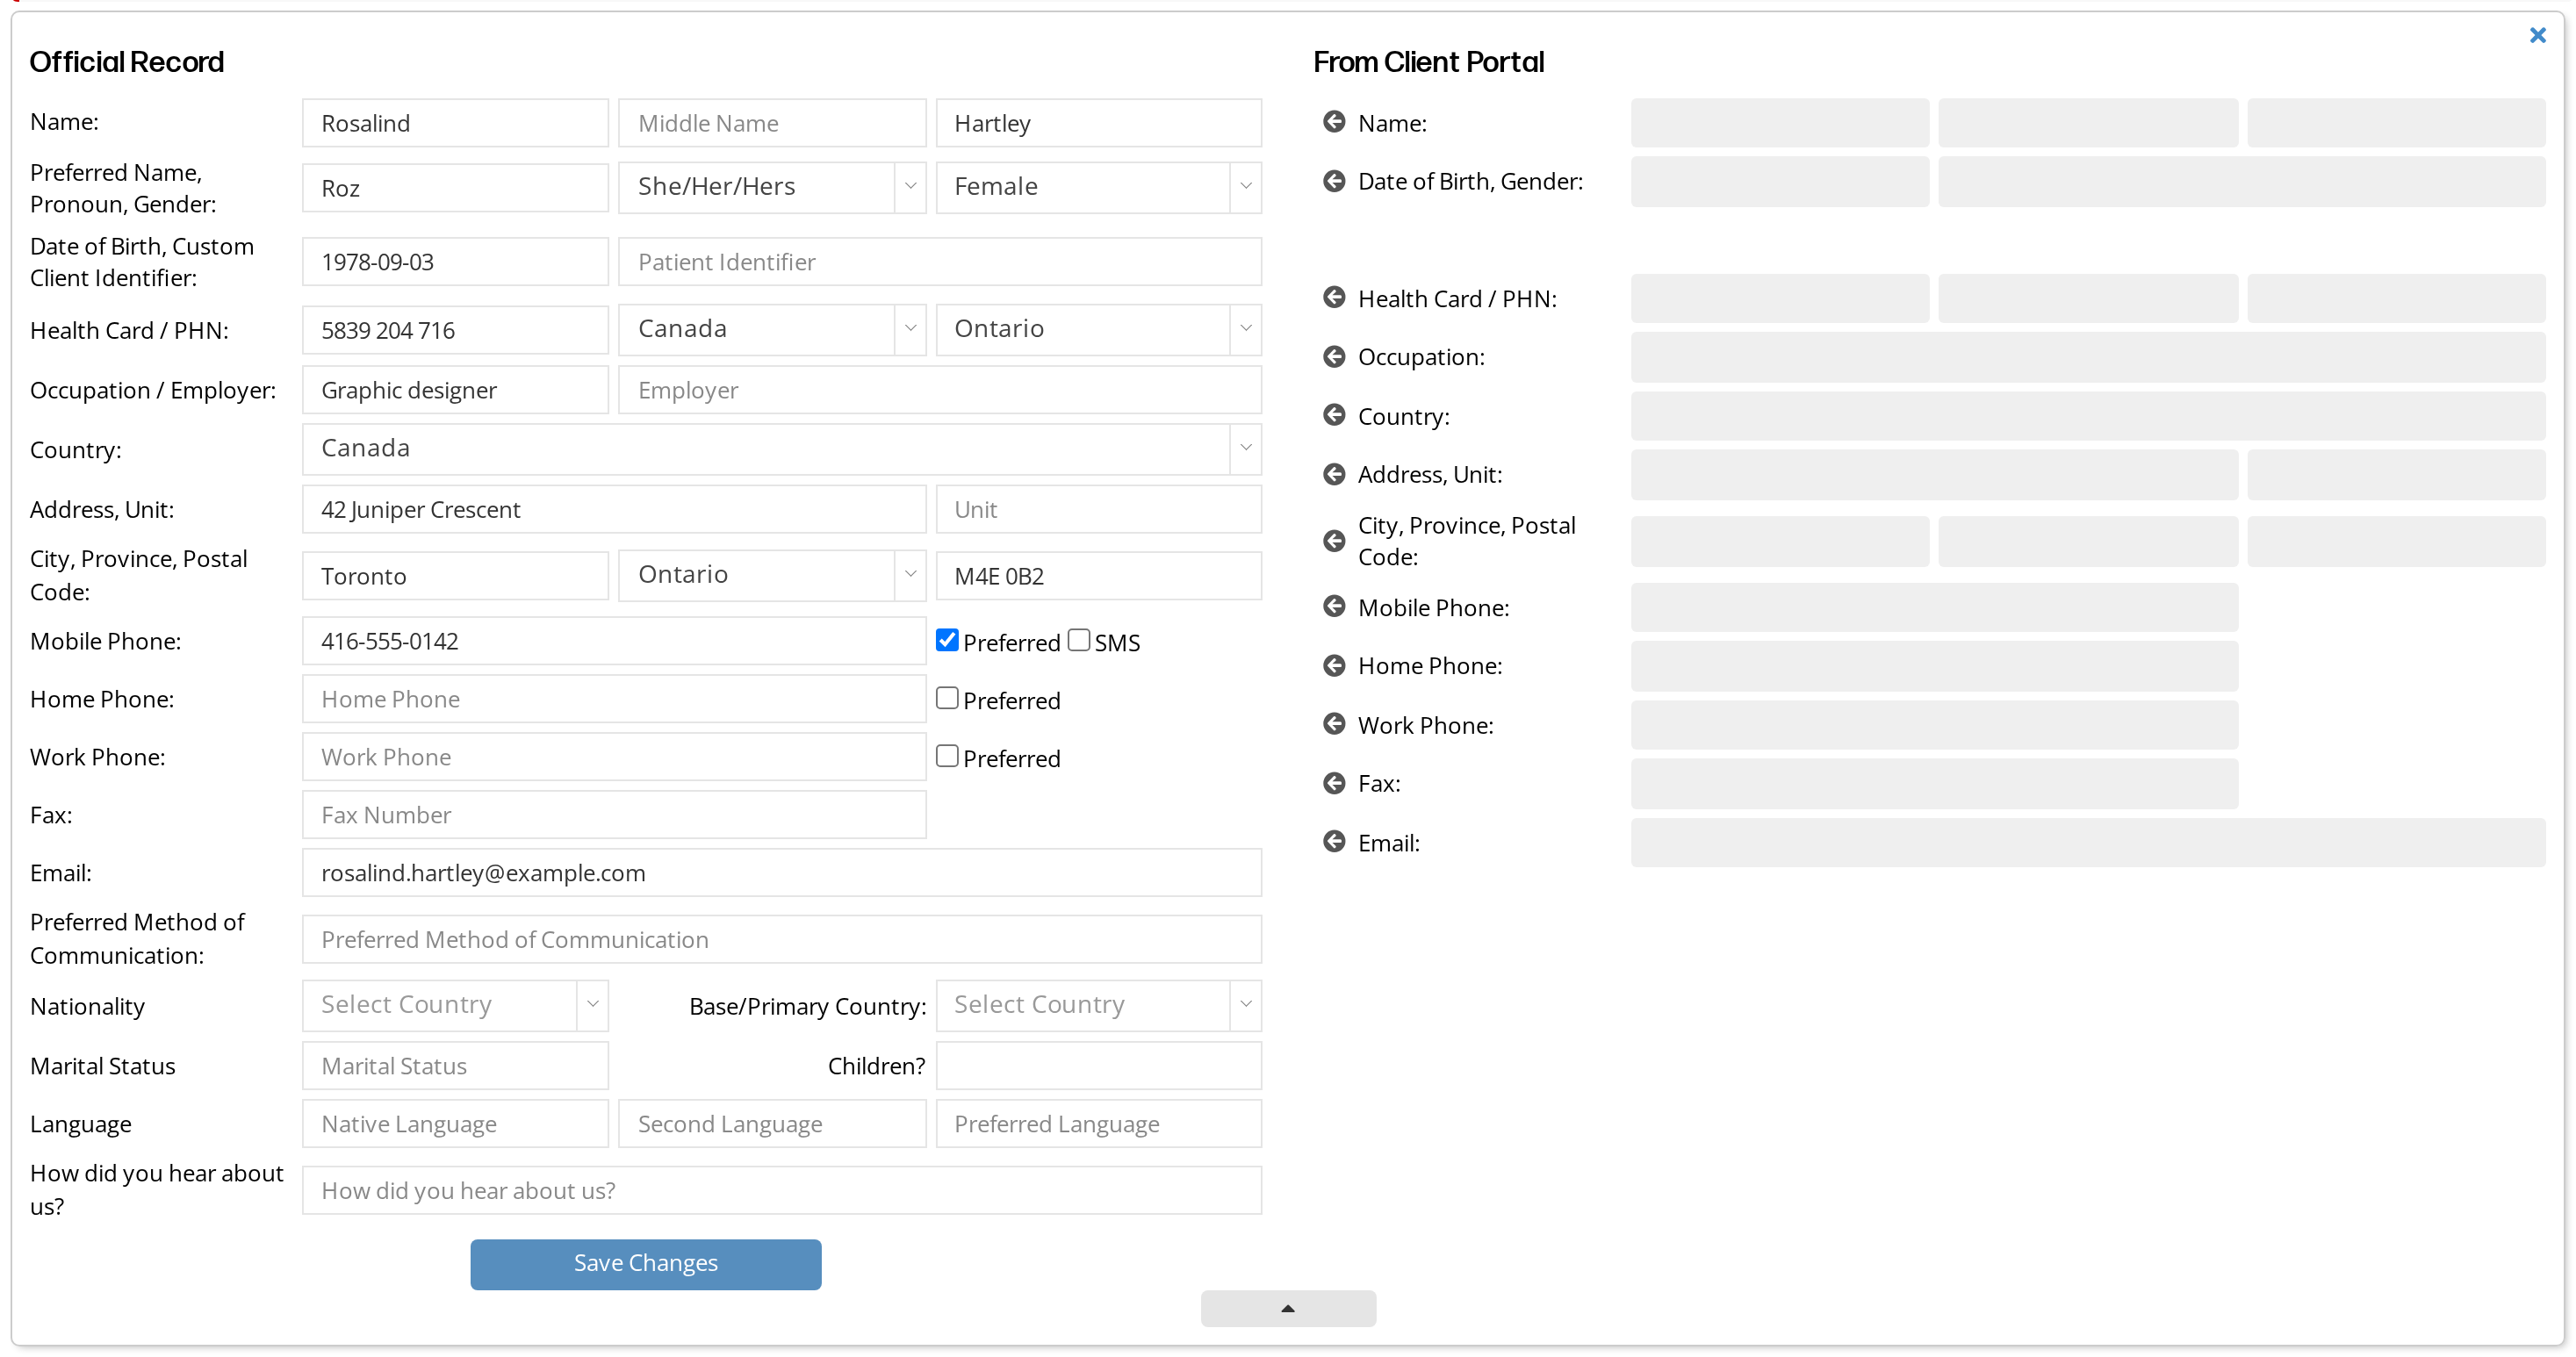
The details panel. Official Record on the left is the patient's record in OutSmart. From Client Portal on the right shows what the patient entered in the patient portal, with an arrow beside each detail to copy it across.
Official Record, on the left, holds the details on the patient’s record. Change what you need and click Save Changes at the bottom of the column. The panel closes and the card shows the new details.
- The Preferred checkbox beside a phone number marks the number the patient prefers to be called on.
- The SMS checkbox beside the mobile number records the patient’s preference for text messages.
- Custom Client Identifier is a number or code your clinic gives the patient, if you use one.
To close the panel without saving, click the X at its top right corner or the small arrow tab at its bottom edge.
Details The Patient Entered In The Patient Portal
From Client Portal, on the right, shows the details the patient entered in their patient portal profile. What a patient enters there is not written to their record by itself.
Each detail has a round arrow button beside it. Click the arrow to copy that detail into the patient’s record. It is copied straight away, without the Save Changes button, and a message says Patient Information Updated!. Details you do not copy stay as they are on the record.
The column is empty when the patient has not entered anything in the portal. Patient Profile describes the portal side.
Referred By, Newsletter And Labels
The bottom of the card has three details you can change without opening the panel.
- Referred by is a free text box for who referred the patient. Type in it and click the checkmark beside it to save.
- Newsletter is a switch for whether the patient is on your newsletter list. It is saved as soon as you change it.
- Labels are tags for the patient, such as Senior, Student or VIP. Click the box and choose a label from the list. Click the small x on a label to take it off. Labels can decide which promotions and discounts apply to the patient.
When your clinic uses the Active Campaign integration, the card also has a box for the patient’s Active Campaign lists.
Change History
Every change to a patient’s details is recorded. Click the three dots and choose Change history to see the list.
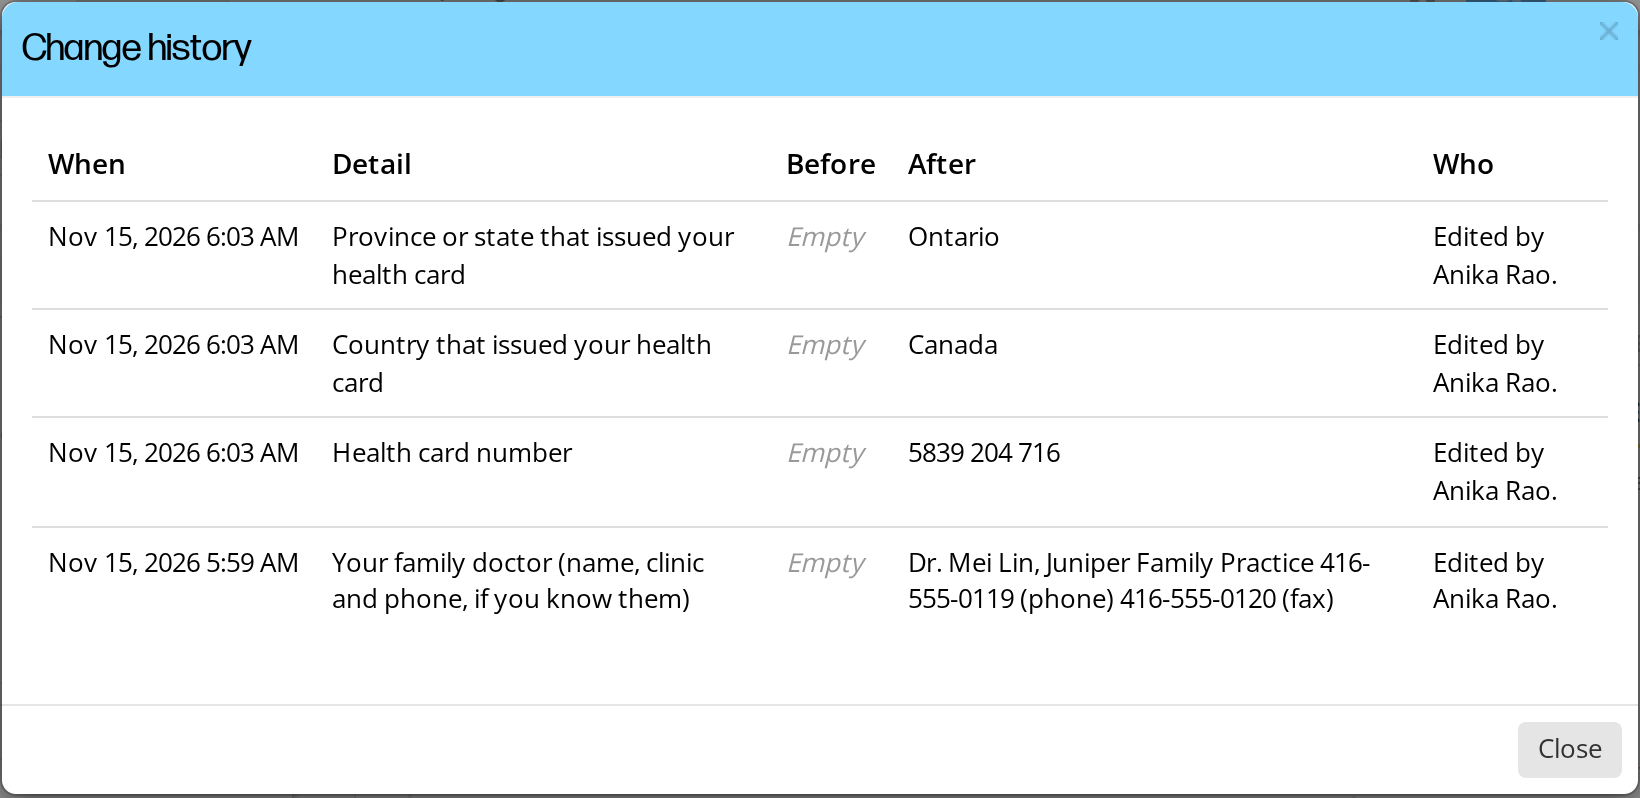
The Change history window. Each row is one detail, with what it was before, what it is now, when it changed and who changed it.
Each row shows when the detail changed, which detail it was, what it was before and after, and who made the change. Changes made in the details panel read Edited by followed by the person’s name. Changes copied from a Client Update say how the patient entered them, as Client Update describes. Changes to the Family Doctor Info box on the workspace are recorded here too.
Related Pages
- Patient Workspace Overview. The page the patient card sits on.
- Copying A Patient’s Details. The copy button and Copy Settings.
- Client Update: Patients Check Their Own Details. Asking the patient to correct their own details.
- When Emails To A Patient Are Stopped. The mark beside the email address.
- Merging Duplicate Patient Records. What to do when one patient has two records.