Patient Correspondence Tool
The Patient Correspondence tool lets practitioners create letters to other providers without leaving OutSmart. One builder produces four kinds of letters: a Patient Referral, a Patient Update, a Patient Consultation, or a Clinical Care Request. An optional AI assist can draft the letter from the patient’s chart, which you then review, edit, sign, and finalize.
Finalized letters are filed in the patient’s documents as PDFs. They can then be faxed, emailed, or shared just like any other document.
Opening the Patient Correspondence builder
- Open the Patient Workspace for the patient. Search for the patient in the top search bar and click the Patient Workspace button on the result.
- In the workspace toolbar, click the Create Patient Correspondence button. It’s the envelope icon with an arrow, between the chart icon and the gear.

The Create Patient Correspondence button on the Patient Workspace toolbar. It opens the correspondence builder for the patient currently in the workspace.
The builder opens in a new tab. The patient is already filled in from the workspace you came from.
The four letter types
The first thing the builder asks for is Letter type. Pick one of four cards. Each card explains in plain language when to use it.
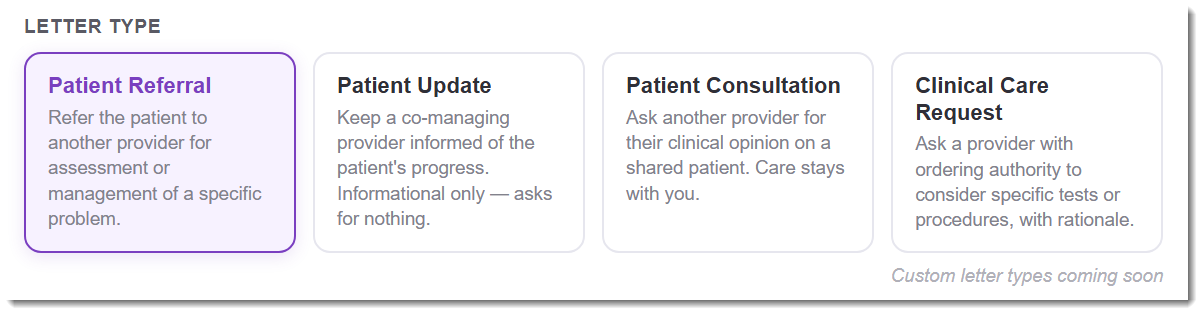
The four letter types. Pick the one that matches what you're actually writing. The choice is visible in the page heading, the recipient label, and the Generate button.
| Letter type | What it’s for |
|---|---|
| Patient Referral | Refer the patient to another provider for assessment or management of a specific problem. Use this when you’re handing off (or sharing) care of a problem. |
| Patient Update | Keep a co-managing provider informed of the patient’s progress. Informational only. You’re not asking the recipient to do anything. |
| Patient Consultation | Ask another provider for their clinical opinion on a shared patient. Care stays with you. This is “I want your read on this” rather than “please take this over”. |
| Clinical Care Request | Ask a provider with ordering authority to consider specific tests, imaging, or procedures, with rationale. Use this when you can’t order something yourself and need the recipient to consider doing so. |
Pick the type that matches what you’re actually writing. The choice changes how the page heading reads, what the recipient field is labelled, and what kind of letter the AI writes if you turn the AI on.
Setting up the letter
Below the letter type cards is a row with three fields: Date, Patient, and Recipient.

The setup row. Date defaults to today, Patient is pre-filled from the workspace you came from, and Recipient is picked from your address book.
- Date defaults to today. Change it if the letter is dated differently.
- Patient is pre-filled from the workspace you came from. Change it only if the letter is actually for a different patient.
- Recipient is picked from the Contact dropdown. This list is your address book, shared with the fax system. Any contact you’ve added for faxing is available here too.
If the recipient isn’t in your address book yet, add them as a new contact from the same dropdown. Once added, they’re available for future correspondence and faxes.
Using the AI assist (optional)
Below the setup row sits a Generate with AI toggle. It defaults to ON, but is collapsed behind the toggle so it doesn’t get in the way if you’d rather write the letter yourself.
- Turn the toggle on to use AI to draft the letter for you. The AI panel opens and shows an instructions field, an acknowledgment, and a Generate Letter button with your remaining AI credits.
- Turn the toggle off if you’d rather skip the AI entirely. The panel collapses out of the way and you write the letter from scratch in the editor below.
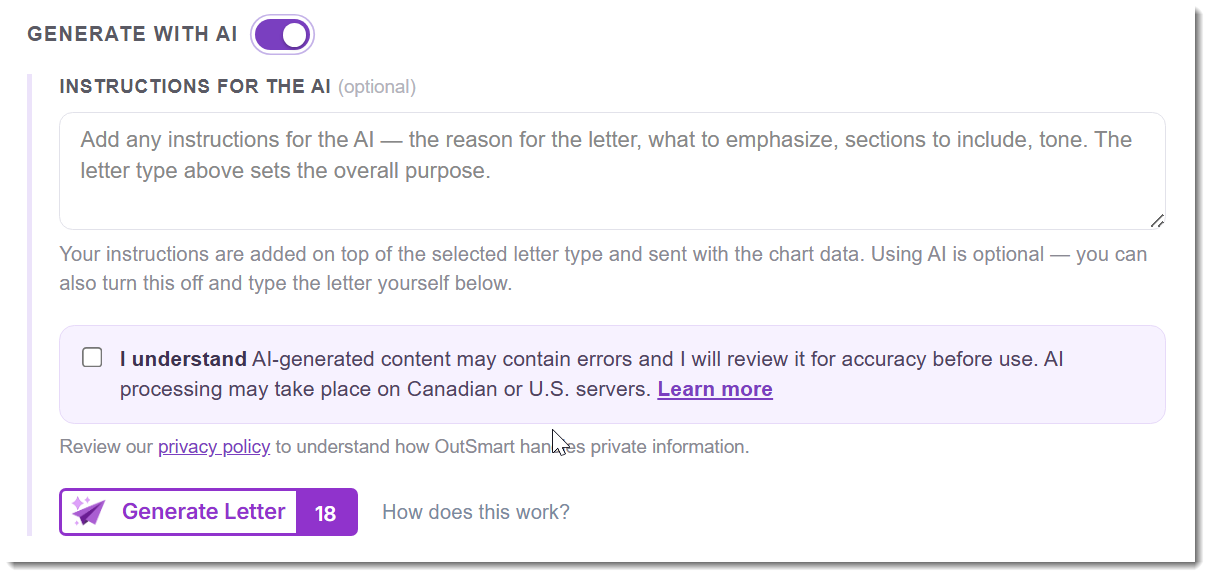
What you see when the Generate with AI toggle is on: an instructions field, the I understand acknowledgment, a privacy policy link, and the Generate Letter button with your remaining AI credits. The full AI workflow is covered in Patient Correspondence (AI).
The full AI workflow (instructions, what the AI does for each letter type, the acknowledgment, what to do when the draft isn’t quite right) is covered in Patient Correspondence (AI) in the AI in OutSmart section. The rest of this article covers the parts that work the same whether or not you use the AI.
Writing the letter
Below the setup panel, a divider reads ── LETTER PREVIEW ──. Everything below it is what the letter will look like when finalized.

The letter preview area. The patient header and date are filled in for you. The editor is where the letter body goes.
The patient header card and the date are filled in for you and update if you change the fields above. The white editor area below is where the letter body lives. If you used the AI to draft the letter, the draft appears here. If you didn’t, this is where you type.
The editor handles bold, italic, and underline, and has a button to strip formatting (useful when pasting from Word or another email or document). Pasted content from Word generally cleans up well: bold and italics survive, junk styling is stripped.
You can edit any part of the letter the AI produced. The AI draft is a starting point. Rewrite it, expand on what was thin, trim what was extra.
Adding your signature
Scroll to the bottom of the letter preview. A signature block waits there with two ways to provide your signature.
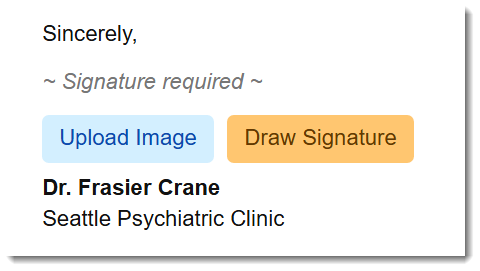
The signature block. Upload an image of your signature, or draw one with a stylus or mouse. Either is saved to your account for next time.
- Upload Image. Pick an image file of your signature. Useful if you have one already.
- Draw Signature. Draw your signature directly on screen with a stylus, mouse, or touchscreen.
Either method saves the signature to your account, so the next letter you write uses it automatically. You can replace it for a specific letter if you need to.
Save, Preview, and Finalize
Three actions live at the top right of the builder.

The three actions for the letter. Save Draft keeps an editable copy. Preview shows the letter as it will print. Finalize files it as a PDF and locks it.
| Action | What it does |
|---|---|
| Save Draft | Saves the in-progress letter. Drafts appear in the Documents tab of the Patient Workspace in the Draft Correspondence section. Drafts can be reopened and edited later. |
| Preview | Shows the letter exactly as it will look when finalized, with the clinic header, patient and recipient details, letter body, and signature. Use this before finalizing. |
| Finalize | Generates the finished letter as a PDF and files it in the patient’s documents. Finalized letters cannot be edited. |
Finalized PDFs include the clinic header and logo, the date, the patient details, the recipient details, the letter body, and the practitioner’s signature. Once filed, the letter lives in the patient’s documents and can be faxed, emailed, or shared like any other document.
Managing draft correspondence
Letters you’ve started but not yet finalized live in the Documents tab of the Patient Workspace, in a section called Draft Correspondence at the top.
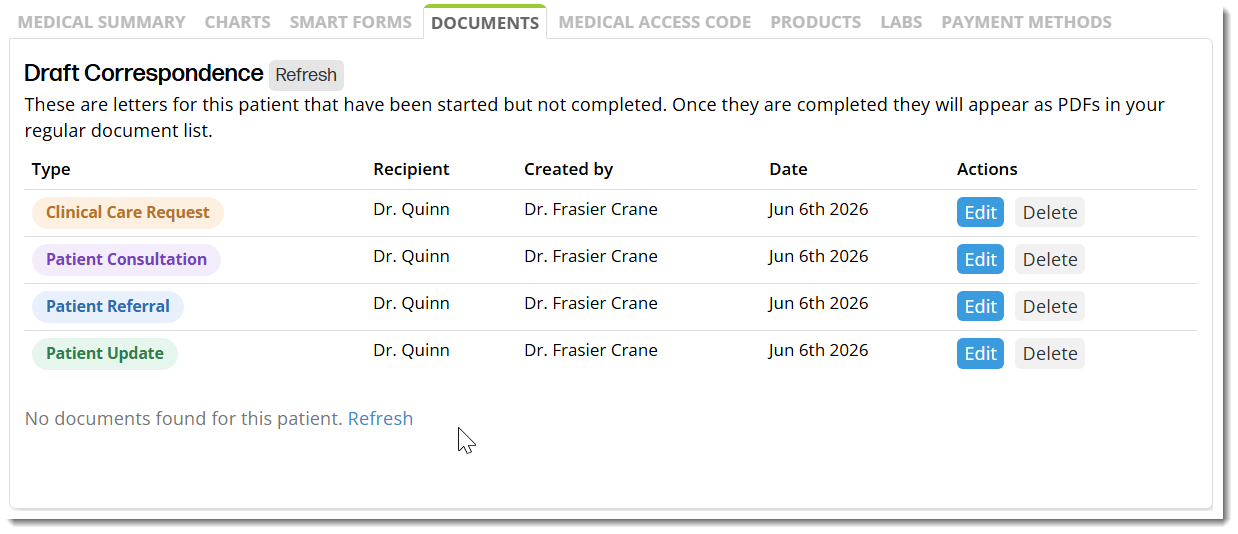
The Draft Correspondence section on the Documents tab. Letter type is shown as a coloured tag (one colour per type), with Edit and Delete actions for each draft. Finalized letters move to the regular documents list as PDFs.
For each draft you can:
- Edit. Reopen the builder and continue working.
- Delete. Remove the draft if it’s no longer needed.
To finalize a draft, click Edit, review the letter, then click Finalize at the top right of the builder.
Letter type is shown as a coloured tag on each row so a long draft list is easy to scan:
| Tag colour | Letter type |
|---|---|
| Blue | Patient Referral |
| Green | Patient Update |
| Purple | Patient Consultation |
| Amber / orange | Clinical Care Request |
What admin staff can do
Admin staff cannot create or finalize patient correspondence. Only practitioners can. Admin staff can:
- See draft correspondence created by practitioners, listed in the patient’s Documents tab.
- Click Edit on a draft to open it in read-only mode and Preview the letter to see what it will look like.
- See finalized letters as PDFs in the patient’s documents and fax, email, or share them like any other patient document.
The distinction protects the clinical authorship of the letter while still letting admin staff handle distribution once a practitioner has signed off.
Related Pages
- Patient Correspondence (AI). The AI side of the workflow. What the AI does for each letter type, the instructions field, the acknowledgment, what an AI draft costs.
- Sending and Receiving Faxes. The address book the correspondence tool draws from, and how to fax a finalized letter.
- Sharing Documents With Patients. Sharing a finalized letter PDF with the patient.
- Uploading and Managing Documents. How finalized letters behave once they’re in the Documents Module.
- AI and Health Information. The privacy framework, safeguards, and a suggested consent-form paragraph for AI features including the AI letter draft.