

Booking Events
Quick Start: Creating an Event
The fastest way to create an event:
-
Click on the calendar at the time you want to book
-
The Event Editor panel, titled New Event, slides in from the right
-
Fill in the event details
-
Click Save, or click Save & Send to save the appointment and send the patient a confirmation
You can create an event in under 30 seconds by clicking directly on your calendar!
The Event Editor
When you click on the calendar, the Event Editor panel appears on the right side of your screen. This is your control center for creating and managing events.
From top to bottom, the panel has these fields: Practitioner, Patient, Type of Event, Office / Rooms, Date & Time, Status and Description. The Save and Save & Send buttons sit at the bottom of the panel.
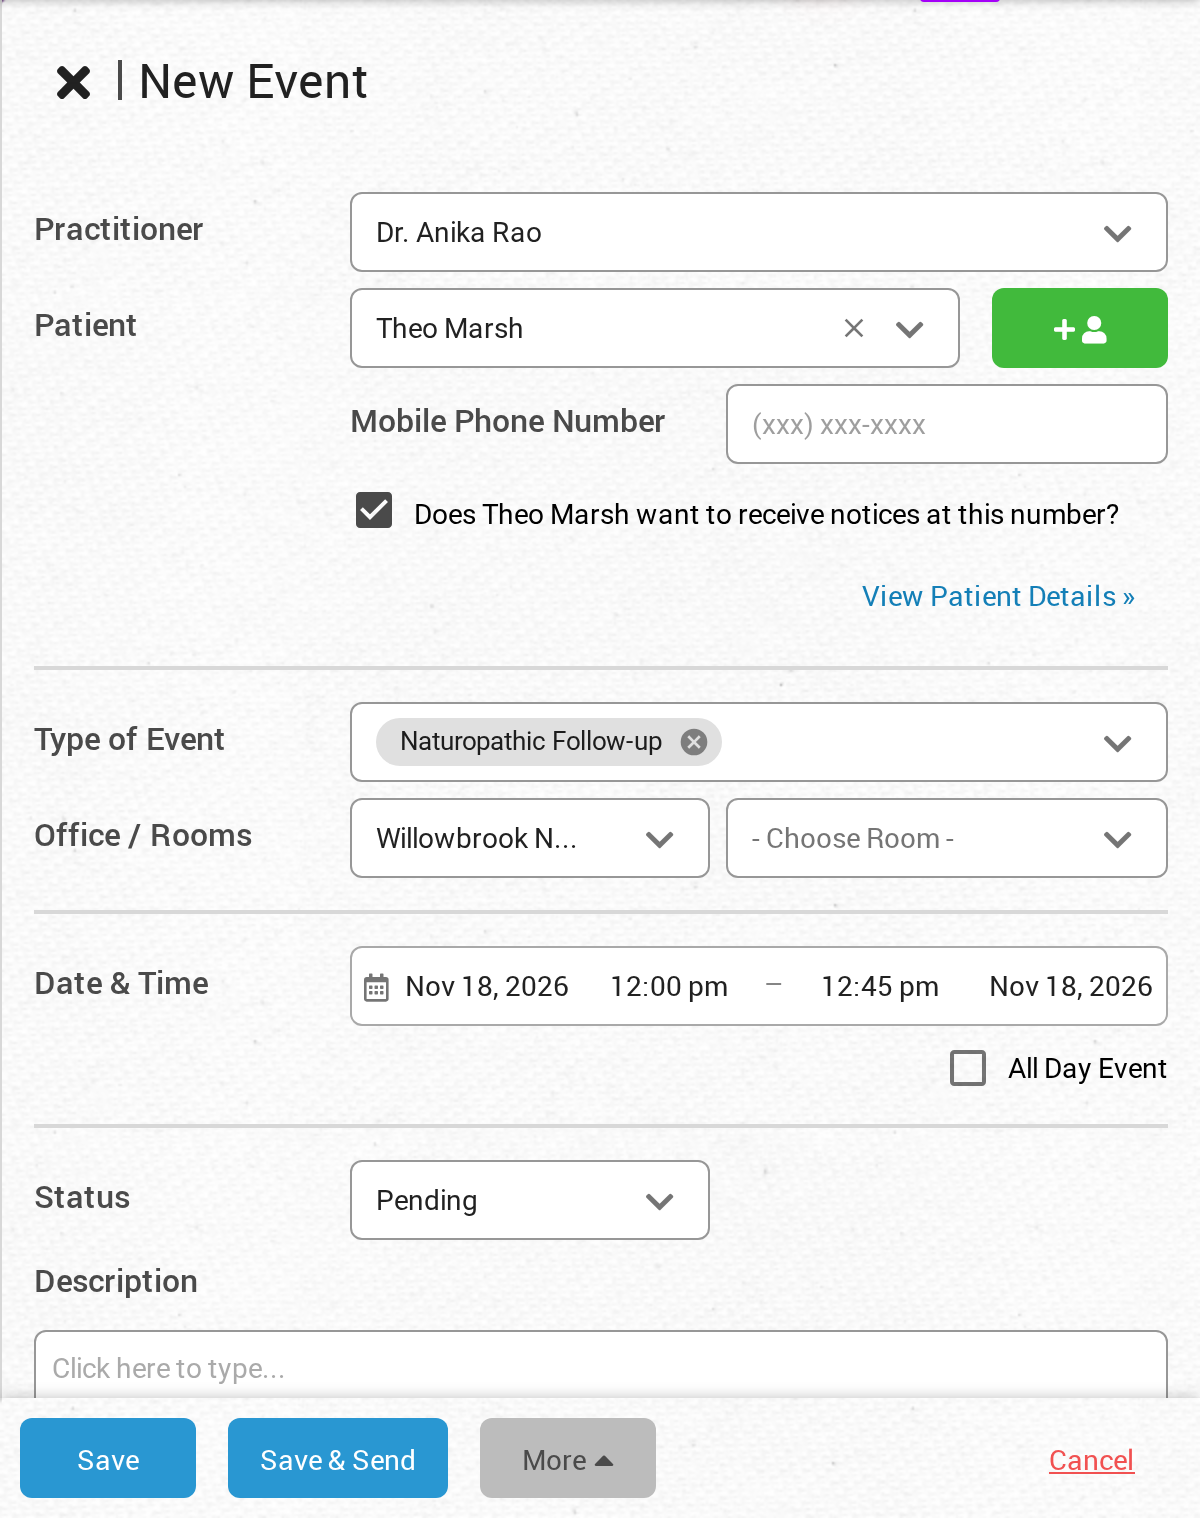
The New Event panel opens on the right when you click an empty time in the calendar.
Step-by-Step: Booking a Patient Appointment
Follow these steps to create a complete patient appointment:
1. Open the Event Editor
Click on the calendar at the desired appointment time. The Event Editor panel will slide in from the right.
2. Select the Practitioner
Choose the practitioner from the dropdown menu. This determines who will be seeing the patient.
3. Select or Create a Patient
You have two options:
Option A: Select an Existing Patient
- Click on the Patient dropdown
- Type at least two letters of the patient’s name
- The system will search and display matching patients
- Click on the patient to select them
Option B: Create a New Patient
- Click the green button with a plus sign and a person icon, to the right of the Patient field. Its name, Add New Patient, appears when you hover over it.
- The Add New Patient form opens in the same panel.
Creating a New Patient
When you click Add New Patient, you’ll see a form with the following fields.
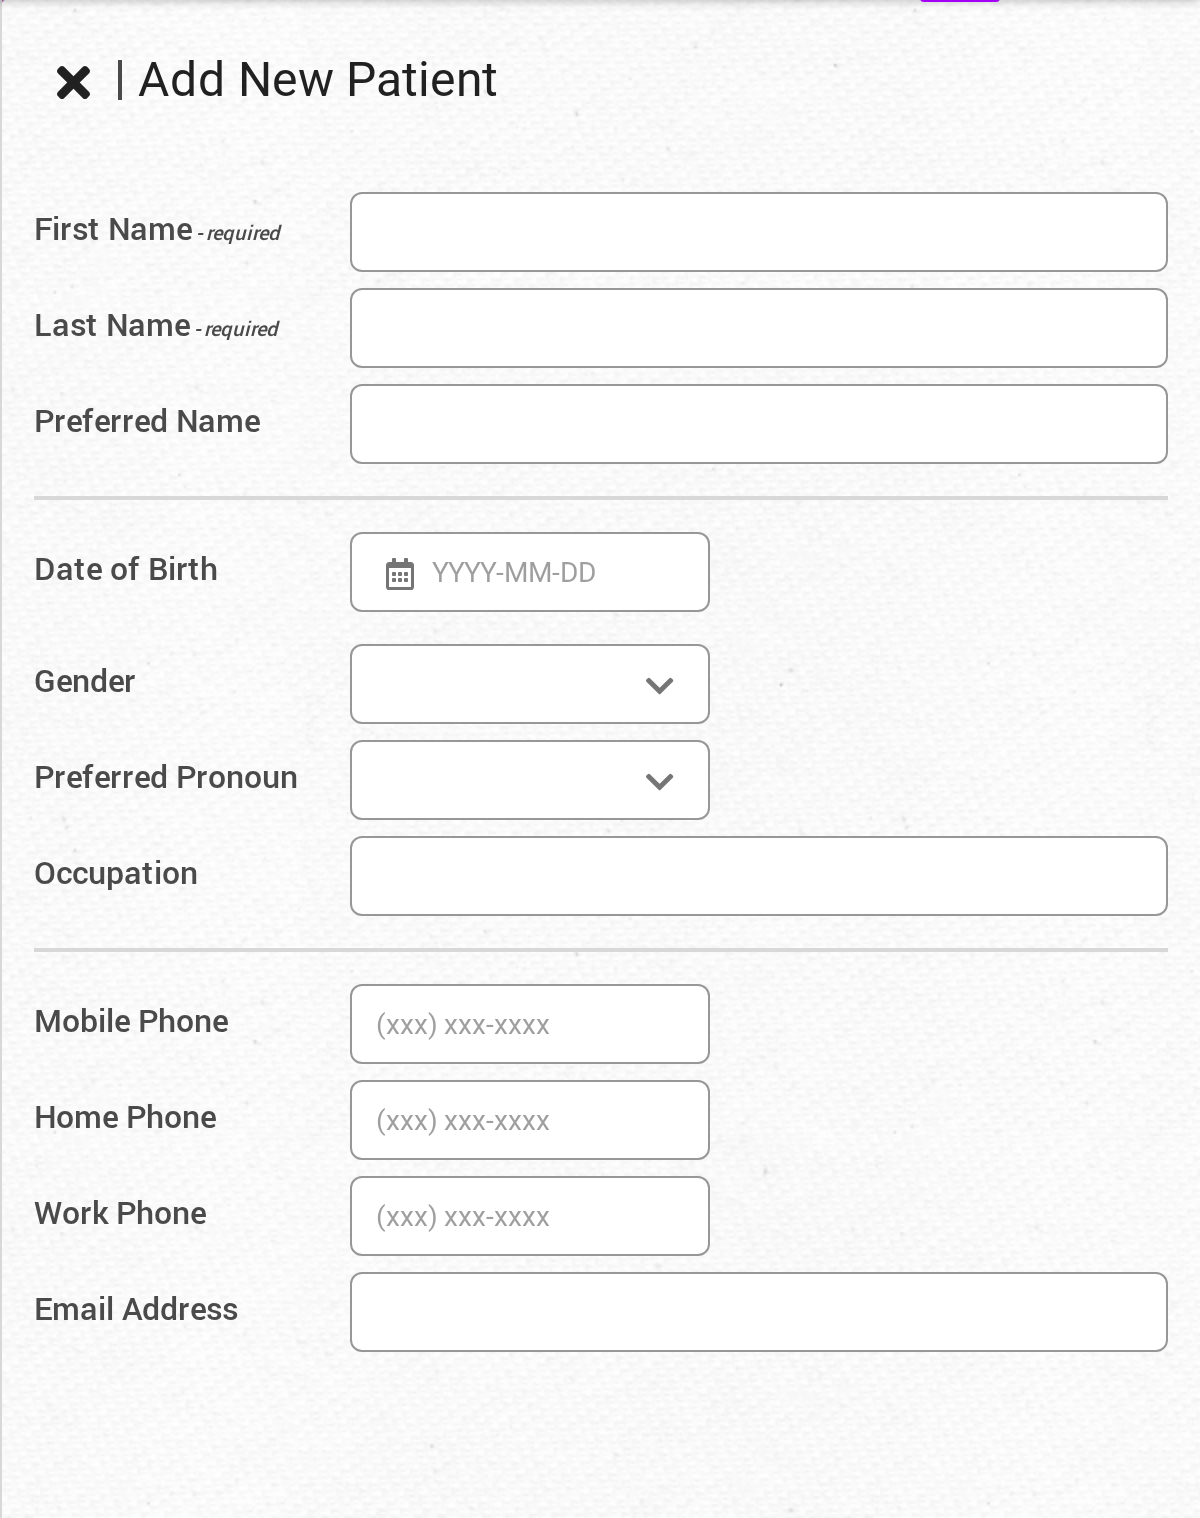
The Add New Patient form. Only the first name and the last name are required.
Required Fields
OutSmart requires only the First Name and Last Name. We recommend also collecting these fields so you can identify and contact the patient:
- Date of Birth: for identification and age verification.
- Phone Number: a mobile, home or work phone.
- Email Address: for appointment confirmations and other messages.
All Available Fields
The complete patient form includes:
| Field | Description |
|---|---|
| First Name | Legal first name |
| Last Name | Legal last name |
| Preferred Name | What the patient likes to be called |
| Date of Birth | Birth date (YYYY-MM-DD) |
| Gender | Gender identity |
| Preferred Pronoun | How to refer to the patient |
| Occupation | Patient’s profession |
| Mobile Phone | Cell phone number |
| Home Phone | Residential phone number |
| Work Phone | Business phone number |
| Email Address | Primary email contact |
Saving the New Patient
Once you’ve entered the patient information:
- Click save changes at the bottom of the form
- The patient will be added to your account
- The patient will be automatically selected in the Event Editor
- You can now continue booking the appointment
What Appears Once a Patient Is Chosen
When a patient is chosen in the Patient field, more information appears just below it:
- Patient alerts: any alerts on the patient’s record are shown in a box, so you see them while you book. See Calendar Alerts.
- Email status: if emails to the patient’s address have been stopped, a short Emails stopped line explains why.
- Mobile Phone Number: the patient’s mobile number. You can correct it here.
- Text message checkbox: the checkbox below the number asks whether the patient wants to receive notices at this number. Check it to send appointment notices to the patient by text message.
- View Patient Details: this link opens more information about the patient beside the panel.
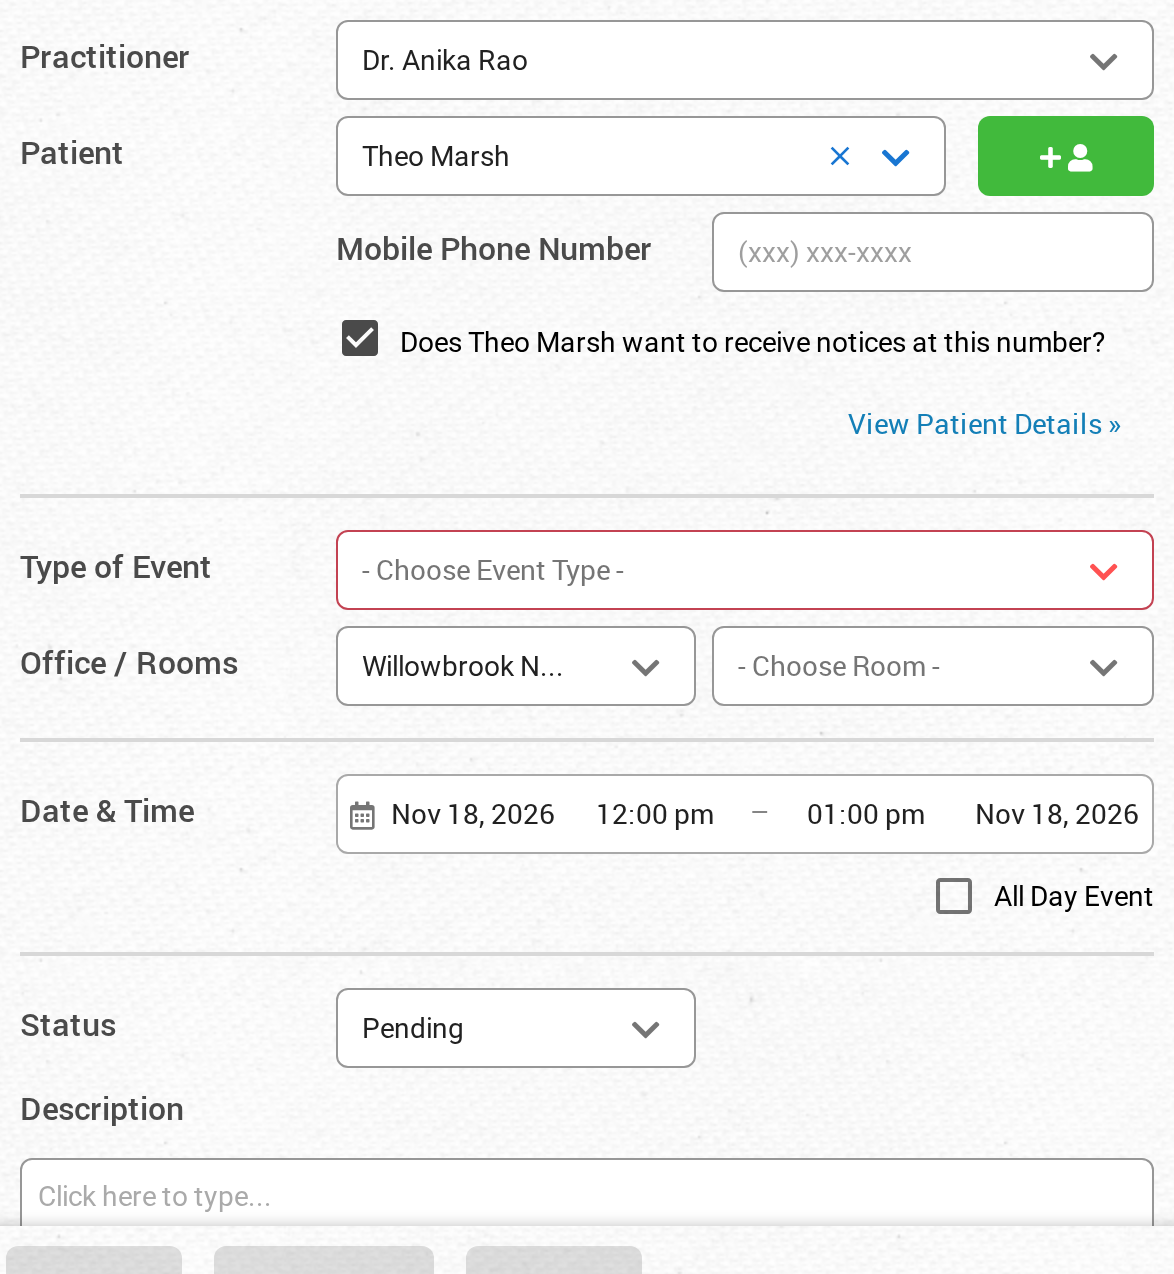
Once a patient is chosen, check the box under Mobile Phone Number if the patient wants appointment notices by text message.
Selecting the Event Type
After choosing the patient (or skipping this step for non-patient events):
-
Click the “Type of Event” dropdown
-
Select the appropriate event type from the list. The length of the first event type you choose sets the end time of the event.
Event types are created in the Event Manager. You'll see all event types you have access to in this dropdown.
You can choose more than one event type for the same event. Each type you choose appears as a small tag in the field. To remove a type, click the small x on its tag.
Event Types Examples
- Initial Assessment
- Follow-up Visit
- Treatment Session
- Consultation
- Break
- Vacation
- Blocked Time
Setting Location Details
The Office / Rooms fields sit just below Type of Event.
Office Selection
Choose the office where the appointment will take place. If you’re already logged into the correct office, this will be pre-filled.
Room Selection (Optional)
If your clinic has specific rooms and you need to specify where the event takes place:
-
Click the room field (it shows - Choose Room - when it is empty)
-
Select the appropriate room. You can choose more than one room, and each room appears as a small tag in the field.
You can leave the room field blank if you don't need to specify a particular location within your clinic.
Adjusting Date and Time
The Event Editor displays the date and time based on where you clicked in the calendar, but you can adjust it:
Manual Time Adjustment
The Date & Time row has four boxes: the start date, the start time, the end time and the end date.
- Edit the start date to change the appointment date
- Edit the start time to change when the appointment begins. Type times in the form 12:00 pm.
- Edit the end time or end date to change when the event finishes. The end time is first set by the length of the event type you chose.
- Check the All Day Event box to make the event last the whole day. The time boxes are hidden while it is checked.
Drag and Drop Adjustment
While the Event Editor is open:
-
The event is visible on the calendar (left side of screen)
-
You can grab the event and drag it to a new time
-
The date and time fields will automatically update in the Event Editor
Tip: Use drag-and-drop to visually find the perfect time slot while keeping the Event Editor open!
Setting Event Status
Default Status: Pending
When creating a new event, the status starts as Pending. This indicates the appointment is scheduled but not yet confirmed.
Available Statuses
Events can have different statuses throughout their lifecycle. The Status list has these choices:
| Status | When to Use |
|---|---|
| Pending | Initial booking, not yet confirmed |
| Booked | The appointment is booked |
| Confirmed | Patient has confirmed attendance |
| Reminded | Reminder sent to patient |
| Left Message | You left the patient a message about the appointment |
| Checked-in | The patient has arrived at the clinic |
| Attended | The patient came to the appointment |
| Attended Late | The patient came to the appointment late |
| Completed | Appointment finished successfully |
| Rescheduled | The appointment was moved to a different time |
| Cancelled | Appointment cancelled |
| Cancelled with notice | The patient cancelled and gave notice |
| Cancelled without notice | The patient cancelled without giving notice |
| No Show | Patient didn’t attend |
Adding Event Description
The Description field allows you to add notes or details about the appointment:
- Add appointment-specific notes
- Include special instructions
- Note specific concerns or requests
- Record any relevant context
Saving the Event
Once all details are complete, you have two save options:
Option 1: Save
Click the “Save” button to:
- Save the appointment to the calendar
- Create/update the patient record
- Close the Event Editor
The appointment is saved but no notifications are sent.
Option 2: Save & Send
The Save & Send button appears only when a patient is chosen in the Patient field.
Click the “Save & Send” button to:
- Save the appointment to the calendar
- Create/update the patient record
- Send a confirmation email to the patient
- Include any attachments specified for this event type
- Send links to intake forms if configured
- Close the Event Editor
More: Send or Copy a Booking Link
When you are booking a new event for a patient, a grey More button appears beside Save & Send. It has two choices:
- Send booking link emails the patient a link to your online booking page, so the patient can pick the time themselves.
- Copy booking link copies the same link so you can paste it into a message of your own.
The More button does not appear when you are editing an event that is already saved. See Sending a Booking Link From the Calendar.
Email Confirmations and Intake Forms
What Gets Sent?
When you click Save & Send, the system will automatically:
- Send a confirmation email using the custom message template for this event type (if configured)
- Attach any files you’ve linked to this event type
- Include intake form links if SmartForms are assigned to this event type
Example: First Visit Appointment
If you created a “First Visit” event type with:
- Custom welcome email message
- Clinic policy PDF attachment
- New patient intake form (SmartForm)
When you click Save & Send, the patient receives:
- Your custom welcome message
- The clinic policy PDF
- A clickable link to complete the intake form online
After Saving the Event
Once you click Save or Save & Send:
- The event appears in your calendar at the scheduled time
- The Event Editor closes
- The patient record is created or updated
- You can still modify the event by clicking on it
- You can move it by dragging and dropping
Creating Non-Patient Events
For events that don’t involve patients (breaks, vacation, etc.):
To block online booking, the event must be created as a timed event in the day view of the calendar. Clicking the all-day row at the very top of the calendar creates an event that appears in your calendar visually but does not block online booking, so patients can still book during that time. For a multi-day block such as a vacation, create a timed event (for example, 9 AM to 5 PM) in the day view, then use the repeat option to apply it to every day in the range.
-
Click on the calendar at the desired time
-
Skip the patient selection - leave it blank
-
Select the event type (Break, Vacation, etc.)
-
Fill in any description if needed
-
Click Save
Patient selection is only required for patient-related events. Breaks, vacation, and administrative time don't need a patient.
Troubleshooting
Can’t Find a Patient
If you can’t find your patient in the patient drop-down list, but you’re certain that your patient is in your account, it could be that the patient is part of a different clinic.
How to check if the patient is part of a different clinic: The Office / Rooms field sits below Type of Event in the Event Editor. It could be that this patient has booked with you at a different office. Select a different office and then search for the patient. If you find them, you can then change the office back to the one you want to book them into. This will connect that patient to the new office.
Using the main search bar to find a patient: You can also search for the patient using the main patient search bar at the top of the screen. This will search across all of your offices at the same time. When the patient shows up in the search list, you can click on the button that says “More Info”. This will show you all of the patient’s connections across all their offices. You can then manually connect patients to different offices from there.
If none of this works to find your patients, try the options below:
- Try searching by last name only
- Check spelling
- Search by first few letters: “joh” will find “John Johnson”
- If still not found, create them as a new patient
You can’t see the event that you created.
If you can’t see the event that you just created, it’s possible that it has been created, but your display settings on your calendar are not showing it:
- Make sure the practitioner’s events visibility is enabled: Check to the left of your calendar to ensure that the practitioner for whom you created the event is check-marked.
- For hours of operation: If you just created hours of operation and you can’t see them, it could be that the hours of operation visibility checkmark is not set for this practitioner. Find the practitioner in the left column of the calendar, and ensure there’s a check mark in the little calendar icon to the right of their name. This shows hours of operation and other background events.
- Check the time range of your calendar: Your calendar may start at 12 a.m., which would mean that the event would be lower down - you could scroll down to find it. You can edit the time range of your calendar in the Calendar settings.
- If all else fails, you can use the calendar search feature to search for the event and see if you can find it that way.
Online booking still shows me available during my blocked time
If patients can still book during a time you’ve blocked off, the block was probably created as an all-day event at the top of the calendar instead of as a timed event in the day view. Only timed events (with a specific start and end time inside the day view) are checked by online booking when deciding which slots to offer. All-day events at the top of the calendar are visual reminders only and do not affect booking availability.
To fix it: delete the all-day event, then in the day view create a timed event for the hours you want blocked (for example, 9 AM to 5 PM) and use the repeat option to cover every day of the block.